Gardening resources
Gardening projects to do at home
- Windowsill and doorstep gardening ideas
-
If you have a bright windowsill, balcony, small patio or even an area by your doorstep, you ought to be able to grow something. You can also try growing a few things indoors provided it’s not too hot or dark. The only thing which is essential for success is soil, enough light and water. Plus of course a container to grow in – of which there are numerous options!
The ideal container for a windowsill is a narrow planter with enough depth for soil but not too heavy or big to move when planted-up. You can also sow seeds in a sturdy bag filled with soil as long as you make some drainage holes in it which could be placed outside a back door. There are lots of ready-made planters other than pots to choose from in different colours, designs and materials. You can also use recycled things like old wooden wine boxes, small crates, metal cans, even sturdy cardboard boxes - though these would probably only be suitable to use once.
Hanging baskets is another growing option. Think of things you’d like to use in the kitchen that will grow quickly and be ready to pick not long after sowing seeds.
Salad leaves are probably top of the list for quick wins along with spring onions, radishes and herbs like parsley, basil and mint. Potatoes can be grown in containers but these will need to be deeper so you can earth them up as they grow to keep off sun light otherwise tubers will go green. A large bag or even a dustbin can be used and often result in impressive yields.
Tomatoes, traditionally planted in grow bags, are also easy if they get regular feeding and enough direct sunlight. The key to success is not to plant too many in a limited space as they need plenty of air around them. Look out for the smaller varieties as some plants can grow easily over a meter tall. Tumbling Toms are a great small variety for hanging baskets.
- Growing salads in a mini raised bed
-
It is quite possible to grow a few simple salads to use in the kitchen without the need for a garden or big outside space. If you have some odd bits of timber boards and a saw and a few metal brackets you can construct a mini raised bed to sow seeds in.
Pieces of board around 15 cm width x 2 cm thick are ideal for a mini raised bed. Measure the area where it will go and then cut the board with a saw to required lengths. A rectangular shape is probably the most useful for growing rows of salad leaves or radishes.
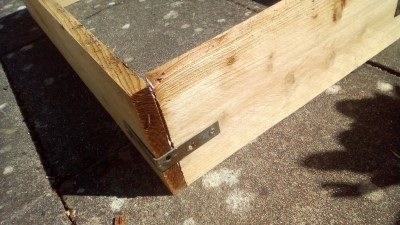
If you have some glue, ideally wood glue, then assemble the cut boards on a flat surface with the longer sections secured to the ends of the shorter lengths. Hold the boards in place with something that will give a bit of pressure to the joined sections while the glue dries – flowerpots and bricks are useful. Leave the glue to set for a couple of hours. Glue on its own is unlikely to be strong enough to hold the boards together once the bed is filled with soil. To make it stronger attach brackets in each corner with screws.

Having already glued the boards will make it easier to hold the shape in place while you attach them. Keeping the boards on a flat even surface while you secure brackets helps reduce any movement as you put the screws in. The size and depth of the bed made will determine how many brackets for extra strength will be required. Double up on brackets with one at the base and the second nearer the top for larger longer or deeper beds. If you can’t get brackets, then a strong piece or string or an old piece of washing line can be tied around the outside of the boards to give it additional strength. Wrap it around several times as tightly as possible.
The next thing to do is line the inside of the boards before adding compost or soil (this stops the compost/soil spilling out). A permeable membrane that allows water to drain through it is ideal, but you could use an old canvas sack or strong bin liner instead. If you use a bin liner make some drainage holes in it with the end of a pair of scissors or knife. Attach the liner inside the boards with a staple gun, or hammer in small tacks. Ensure that you leave a gap around the top edge or around 2cms which will be the final level of the compost/soil.
Once the liner is in attached the compost/soil can be added but make sure you are happy with where the bed will be placed as it will be heavy once filled.
You can use multi-purpose compost or garden soil depending on availability, or a mixture of both. For a small raised bed, 40 litres of compost should be enough, so look for a bag of around this size if buying from a shop, garden centre or online. Of course, you might want to get a bigger bag in case you decide to do more planting later. Check for lumps as you fill the bed and aim for a crumbly texture. If using garden soil remove any obvious stones. It is an idea to give the soil a water before sowing any seeds. This should be done, ideally with a watering can with a ‘rose’ attached - the bit at the end of the nozzle that makes a fine sprinkle as the water is poured. The aim is to make the soil damp but no too wet. Leave for an hour or two to allow the soil to settle.
Packets of seeds are usually available from supermarkets with garden sections, often in hardware shops and online. You might also have seeds you have gathered yourself but for best results use a new packet or one which is still in date. Follow the sowing instructions on the seed packs but also consider the direction of the sun and where shadows will fall. Plants will always grow towards the sun, so the direction of sowing should be made to minimise shading and maximise available light. As a rule, orientate the rows to an east-west aspect where the shading will be smallest. Think too about how big a plant will grow and always allow enough space between rows.
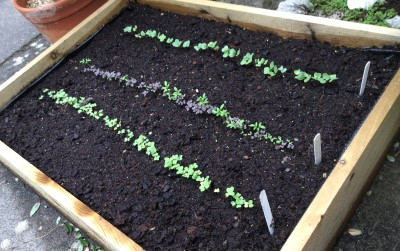
In a small bed it is best to sow rows or ‘drills’ in parallel lines. This allows for easy picking and removal of any unwanted weeds that might grow. When sowing the seeds in shallow drills use a cane or some string as a guide. You can use your finger or the end of a pencil to make the drill. Salad seeds only need to be sown sparingly so you should have plenty left in the packet for consecutive sowings later.
Water carefully, ideally with a watering can, to avoid washing seeds away. Subsequent watering should be done to keep the compost/soil moist but not too wet. If the bed is outside and rain is forecast, then hold off watering until required. If cats or birds are about it is a good idea to cover the beds with some protective sticks canes or netting until germination takes place. Unfortunately, a small raised bed with fresh soil will look remarkably like a cat litter tray to a cat.
Make a note of seeds you’ve planted and the date sown. Usually a small label placed in the bed is the best way to do this. Use a pencil to write with as this won’t be washed away in the rain.
Seeds should germinate within a week to ten days if conditions are right, and small leaves ready to pick within three to four weeks of sowing. Tiny mixed salad seedlings beginning to appear on the surface of the compost just over a week after sowing. Slugs and snails will undoubtably show some interest in what you’re growing which unfortunately is one of the guaranteed hazards of gardening! Seedlings are most vulnerable when small but will survive a light grazing. Remove any slugs or snails away from the area as they appear at dusk or early in the morning and dispose of.
Continue to water regularly in warm dry weather and remove any small weeds as they appear. Carefully thin-out any overcrowded plants once established. Harvest outer leaves frequently to encourage new growth. And all being well the salads should thrive and provide fresh leaves for several weeks to come. Consecutive sowings can be made as necessary with more of the same seed or may be try something different.

